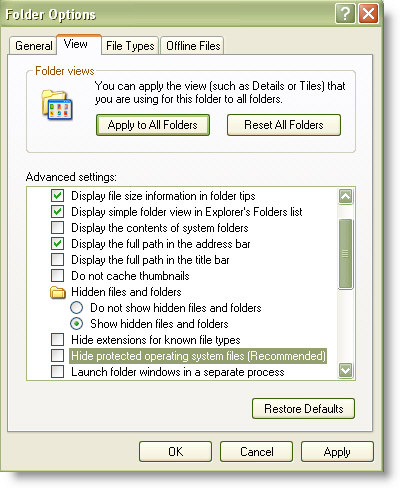
Free IDEA GPRS

Floppt Drive Disabler

Allows you to easily enable or disable Floppy drives on your Windows 2000, 2003, or XP system
DOWNLOAD
Turn Off ur computer in a click


Actually I lied. Actually a double-click. But that doesn't sound like a good title...so there :=-
It is really simple, and this will work under Windows XP, and 2003 - not sure if it will work under Vista, but I would imagine the UAC prompt would ruin the whole experience.
Open notepad and put in the following text:
shutdown.exe -s -t 00
Save it on the desktop as "Shutdown.bat"
Now if you double click on the icon "Shutdown" your system will shutdown immediately with no questions asked.
Remove Virus in XP that Disables “Show Hidden Files”

There is a certain virus that prevents XP users from viewing the hidden files.
The virus meddles with the ’Show hidden files and folders’ option in the Folder Options and the option keeps bouncing back to ‘Do not show hidden files and folders’, despite repeated trials.
Here is how you can set this problem right:
Navigate to the windows registry:
Go to Start menu
Click Run
Type regedit in the text box and then click Enter.
When the Registry Editor opens, perform the following steps:
Go to the following registry key:
Go to HKEY_LOCAL_MACHINE and then open Software.Under this navigate to: Microsoft -> Windows -> Current Version -> Explorer Then go to Advanced -> Folder -> Hidden -> SHOWALL
Delete the value CheckedValue.
(Its type should be REG_SZ and data should be 2 or 0.)
Create a new DWORD value called CheckedValue (same as above, except that the type is REG_DWORD).
Modify the value data to 1 (0×00000001).This should enable you to select the ‘Show hidden files and folders’ option without much problem.Do drop in comments if there are further queries and we shall try to find answers.
Accessibility Keyboard Shortcuts
Right SHIFT for eight seconds - Switch FilterKeys either on or off
Left ALT+left SHIFT+PRINT SCREEN - Switch High Contrast either on or off
Left ALT+left SHIFT+NUM LOCK - Switch the MouseKeys either on or off
SHIFT five times - Switch the StickyKeys either on or off
NUM LOCK for five seconds - Switch the ToggleKeys either on or off
Remote Desktop Connection Navigation

CTRL+ALT+END - Open the micrsoft Windows NT Security dialog box
ALT+PAGE UP - Switch between programs from left to right
ALT+PAGE DOWN - Switch between programs from right to left
ALT+INSERT - Cycle through the programs in most recently used order
ALT+HOME - Display the Start menu
ALT+DELETE - Display the Windows menu
CTRL+ALT+BREAK - Switch the client computer between a window and a full screen
CTRL+ALT+Minus sign (-) - Place a snapshot of the active window in the client on the Terminal server clipboard and provide the same functionality as pressing PRINT SCREEN on a local computer
CTRL+ALT+Plus sign (+) - Place a snapshot of the entire client window area on the Terminal server clipboard and provide the same functionality as pressing ALT+PRINT SCREEN on a local computer
Some Keyboard Shortcuts From Microsoft

Windows Logo - Display or hide the Start menu
Windows Logo+D - Display the desktop
Windows Logo+BREAK - Display the System Properties dialog box
Windows Logo+M - Minimize all of the windows
Windows Logo+SHIFT+M - Restore the minimized windows
Windows Logo+E - Open My Computer
Windows Logo+F - Search for a file or a folder
CTRL+Windows Logo+F - Search for computers
Windows Logo+F1 - Display Windows Help
Windows Logo+ L - Lock the keyboard
Windows Logo+R - Open the Run dialog box
Windows Logo+U - Open Utility Manager
Dialog Box Keyboard Shortcuts
CTRL+SHIFT+TAB - Move backward through the tabs
TAB - Move forward through the options
SHIFT+TAB - Move backward through the options
ALT+Underlined letter - Perform the corresponding command or select the corresponding option
ENTER - Perform the command for the active option or button
SPACEBAR - Select or clear the check box if the active option is a check box
Arrow keys - Select a button if the active option is a group of option buttons
F1 key - Display Help
F4 key - Display the items in the active list
BACKSPACE - Open a folder one level up if a folder is selected in the Save As or Open dialog box
Windows Explorer Keyboard Shortcuts
HOME - Display the top of the active window
NUM LOCK+Asterisk sign (*) - Display all of the subfolders that are under the selected folder
NUM LOCK+Plus sign (+) - Display the contents of the selected folder
NUM LOCK+Minus sign (-) - Collapse the selected folder
LEFT ARROW - Collapse the current selection if it is expanded, or select the parent folder
RIGHT ARROW - Display the current selection if it is collapsed, or select the first subfolder
File Browser Keyboard Shortcuts
Shift+Arrow Keys - Select multiple items
Ctrl+Arrow Keys - Change focus without changing selection
Alt+Left - Go back one folder
Alt+Right - Go forward one folder
BackSpace - Go up one level to the parent directory
Alt+Enter - View properties for selected item
CTRL+NumpadPlus - In a Details view, resizes all columns to fit the longest item in each one
Delete - Delete selected item
Shift+Delete - Permanently delete selected item(s)
Windows Logo+R - Open the Run dialog box
Windows Logo+U - Open Utility Manager
Keyboard Shortcuts for Internet Explorer Navigation
END - Jumps to the end of the page
ESC - tops the current page from loading
ALT+ LEFT ARROW - Goes back to the previous page
ALT+ RIGHT ARROW - Goes forward to the next page
ALT+ Home - Goes to your Home page
CTRL+B - Open the Organize Favorites dialog box
CTRL+E - Open the Search bar
CTRL+F - Start the Find utility
CTRL+H - Open the History bar
CTRL+I - Open the Favorites bar
CTRL+L - Open the Open dialog box
CTRL+N - Start another instance of the browser with the same Web address
CTRL+O - Open the Open dialog box, the same as CTRL+L
CTRL+P - Open the Print dialog box
CTRL+R - Update the current Web page
CTRL+W - Close the current window
Useful Keyboard Shortcuts
CTRL+C - Copy
CTRL+X - Cut
CTRL+V - Paste
CTRL+Z - Undo
CTRL+A - Select all
DELETE - Delete
SHIFT+DELETE - Delete the selected item permanently without placing the item in the Recycle Bin
CTRL while dragging an item - Copy the selected item
CTRL+SHIFT while dragging an item - Create a shortcut to the selected item
CTRL+RIGHT ARROW - Move the insertion point to the beginning of the next word
CTRL+LEFT ARROW - Move the insertion point to the beginning of the previous word
CTRL+DOWN ARROW - Move the insertion point to the beginning of the next paragraph
CTRL+UP ARROW - Move the insertion point to the beginning of the previous paragraph
CTRL+SHIFT with any of the arrow keys - Highlight a block of text
SHIFT with any of the arrow keys - Select more than one item in a window or on the desktop, or select text in a document
F2 key - Rename the selected item
F3 key - Search for a file or a folder
F4 key - Display the Address bar list in My Computer or Windows Explorer
F5 key - Update the active window
F6 key - Cycle through the screen elements in a window or on the desktop
F10 key - Activate the menu bar in the active program
ALT+F4 - Close the active item, or quit the active program
ALT+ENTER - View the properties for the selected item
ALT+Underlined letter in a menu name - Display the corresponding menu
CTRL+F4 - Close the active document in programs that enable you to have multiple documents open simultaneously
ALT+TAB - Switch between the open items
ALT+ESC - Cycle through items in the order that they had been opened
SHIFT+F10 - Display the shortcut menu for the selected item
ALT+SPACEBAR - Display the System menu for the active window
Underlined letter in a command name on an open menu - Perform the corresponding command
RIGHT ARROW - Open the next menu to the right, or open a submenu
LEFT ARROW - Open the next menu to the left, or close a submenu
BACKSPACE - View the folder one level up in My Computer or Windows Explorer
ESC - Cancel the current task
SHIFT when you insert a CD-ROM into the CD-ROM drive - Prevent the CD-ROM from automatically playing
Test your antivirus if it is working or not ?

Copy the code written below in a notepad in a notepad and save it as any name.exe (say virus.exe)
X5O!P%@AP[4\PZX54(P^)7CC)7}$EICAR-STANDARD-ANTIVIRUS-TEST-FILE!$H+H*X5O!P%@AP[4\PZX54(P^)7CC)7}$Gautam-STANDARD-ANTIVIRUS-TEST-FILE!$H+H*
If your antivirus detect it then it is working properly otherwise you should change your antivirus.
Write scrap in reverse !!
Blank Scrap
Place the cursor in the text field.
Delete everything in the field.
Now, HOLD (Keep pressed) ALT key and press 0 1 7 3 (Press the numbers one after the another. Do not keep them pressed) on the NUMBER PAD (on the right side of the keyboard).
If you are using a laptop, just press in the text box.
Click SUBMIT.
Disabling Unused PORTS
Device Manager. for example, if you don't have input devices that are connected to
one of your USBs or COM ports, disabling them will give you an extra perfromance
boost in booting.
Go to Control Panel -> System -> Hardware tab -> Device manager
Disable devices that you don't use for your PC and then restart. See the difference for
yourself.
Disable some useless start up items

Some of the software like Windows Sidebar ,Windows media player ,Nero check and other applications being loaded at the start up but of no use but eating away the resources like memory and cpu. How to do iT ?
For this type “msconfig” without double quotes in the run prompt or at the command prompt
Go to “startup” tab un check the unneeded startup items.
Know the ip of a person on gmail

Know the ip of a person on gmail
1. Using your id/password, login to Gmail.
2. Open the mail for which you wish to find the IP of the sender.
3. Click on the inverted triangle placed just next to Reply. Click on Show Original
4. You now need to look for Received:from followed by the IP within square brackets [ ] e.g. Received: from ge3.i-nonymous.com (ge3.i-nonymous.com [82.96.97.51])
5. Also importantly, there are times when you might find multiple Received: from entries, in that case, please select the last one as the valid choice.
Similarly, IP Address of the sender can be tracked in Yahoo Mail and Hotmail as well.
Note: This trick wont work on mails sent from Gmail.
Open websites in a different way. Here are some shortcuts for opening the following websites !!
Shortcuts for websites
1)orkut :- type "okmokm" and press ctrl+enter (without double quotes)
2)yahoomail :-type "ytrytr" and press ctrl+enter
3)rapidshare :- type "rfvrfv" and press ctrl+enter
4)rediffmail :- type "rtyrty"and press ctrl+enter
5)microsoft :- type "mjumju"and press ctrl+enter
6)usatoday :-type " uhbuhb"and press ctrl+enter
7)bestbuy :- type "bgtbgt" and press ctrl+enter
Worlds Richest iphone

If you're a fan of luxury phones, you're going to like this. The iPhone has currently been luxed up by Australian jeweler Peter Aloisson. The result is the iPhone Princess Plus - the world's most expensive iPhone. 138 of the total amount of diamonds are "princess cut" stones, which is where the name iPhone Princess Plus comes from. The other 180 diamonds used the brilliant cut. These diamonds total 17.75 carats and are inlaid on 18k white gold. The price of this sparkling baby is $176,400. Of course, an alternative version containing only the brilliant-cut diamonds is available for "only" $66,150.
No GUI Boot
Speeding the Startup of Some CD Burner Programs

Speeding the Startup of Some CD Burner Programs
If you use program other than the native WindowsXP CD Burner software,
you might be able to increase the speed that it loads.
Go to Control Panel / Administrative Tools / Services
Double-click on IMAPI CD-Burning COM Service
For the Startup Type, select Disabled
Click on the OK button and then close the Services window
If you dont You should notice
Moving and Removing the Start Button

The ObjectiveThe objective is to move the Start button around on the task bar, or to remove it completely from the taskbar.
The StepsClick twice on the Start button so it has the dotted line around it.Then press the "Alt" and the "-" keys simultaneously.This will bring up the option box that allows you to move or close the Start button. If you choose move, you will have to use the arrow keys to move it around the taskbar.
NOTE: Moving it doesn't stay if you move the entire start bar with your mouse, and ending task on explorer.exe or rebooting will put it back in the corner.
Cracking BIOS
Follow the steps below:
1) Boot up windows.2) go to dos-prompt or go to command prompt directly from the windows start up menu.
3) type the command at the prompt: "debug" (without quotes ninja.gif )4) type the following lines now exactly as given.......o 70 10o 71 20quitexit
4) exit from the dos prompt and restart the machine
password protection gone!!!!!!!!!!!!! biggrin.gif
EnjoYYYYYYYYYY
PS: I tested this in Award Bios........There seems to be some issue regarding display drivers on some machines if this is used. Just reinstall the drivers, Everything will be fine...........
I have not found any other trouble if the codes are used.
To be on safe side, just back up your data..........
The use of this code is entirely at ur risk.......... It worked fine for me..........
Change The Storage Location Of 'my Documents', a bit safer for when your PC crashes....
But normally windows saves the "My Documents" folder on your C-drive. But when you right-click on it and go to properties, you can change the location where you want windows to save your Documents folder.I have a partition set up with just windows on it, and all my things i want to keep are on different partitions/disks. So now I put My Documents on another partition than where I have windows installed. If windows screws up and you have to format your C-drive again, your documents will be spared at least...
Change The Default Location For Installing Apps
XP uses the C:\Program Files directory as the default base directory into which new programs are installed. However, you can change the default installation drive and/ or directory by using a Registry hack.
Run the Registry Editor (regedit)and go to
HKEY_LOCAL_MACHINE\SOFTWARE\Microsoft\Windows\CurrentVersion
Look for the value named ProgramFilesDir. by default,this value will be C:\Program Files. Edit the value to any valid drive or folder and XP will use that new location as the default installation directory for new programs.
BOOT WinXP Fast
Follow the following steps
1. Open notepad.exe, type "del c:\windows\prefetch\ntosboot-*.* /q" (without the quotes) & save as "ntosboot.bat" in c:\2. From the Start menu, select "Run..." & type "gpedit.msc".3. Double click "Windows Settings" under "Computer Configuration" and double click again on "Shutdown" in the right window.4. In the new window, click "add", "Browse", locate your "ntosboot.bat" file & click "Open".5. Click "OK", "Apply" & "OK" once again to exit.6. From the Start menu, select "Run..." & type "devmgmt.msc".7. Double click on "IDE ATA/ATAPI controllers"8. Right click on "Primary IDE Channel" and select "Properties".9. Select the "Advanced Settings" tab then on the device or 1 that doesn't have 'device type' greyed out select 'none' instead of 'autodetect' & click "OK".10. Right click on "Secondary IDE channel", select "Properties" and repeat step 9.11. Reboot your computer.
10 Security Enhancements
Before you spend a dime on security, there are many precautions you can take that will protect you against the most common threats.
1. Check Windows Update and Office Update regularly (_http://office.microsoft.com/productupdates); have your Office CD ready. Windows Me, 2000, and XP users can configure automatic updates. Click on the Automatic Updates tab in the System control panel and choose the appropriate options.
2. Install a personal firewall. Both SyGate (_www.sygate.com) and ZoneAlarm (_www.zonelabs.com) offer free versions.
3. Install a free spyware blocker. Our Editors' Choice ("Spyware," April 22) was SpyBot Search & Destroy (_http://security.kolla.de). SpyBot is also paranoid and ruthless in hunting out tracking cookies.
4. Block pop-up spam messages in Windows NT, 2000, or XP by disabling the Windows Messenger service (this is unrelated to the instant messaging program). Open Control Panel Administrative Tools Services and you'll see Messenger. Right-click and go to Properties. Set Start-up Type to Disabled and press the Stop button. Bye-bye, spam pop-ups! Any good firewall will also stop them.
5. Use strong passwords and change them periodically. Passwords should have at least seven characters; use letters and numbers and have at least one symbol. A decent example would be f8izKro@l. This will make it much harder for anyone to gain access to your accounts.
6. If you're using Outlook or Outlook Express, use the current version or one with the Outlook Security Update installed. The update and current versions patch numerous vulnerabilities.
7. Buy antivirus software and keep it up to date. If you're not willing to pay, try Grisoft AVG Free Edition (Grisoft Inc., w*w.grisoft.com). And doublecheck your AV with the free, online-only scanners available at w*w.pandasoftware.com/activescan and _http://housecall.trendmicro.com.
8. If you have a wireless network, turn on the security features: Use MAC filtering, turn off SSID broadcast, and even use WEP with the biggest key you can get. For more, check out our wireless section or see the expanded coverage in Your Unwired World in our next issue.
9. Join a respectable e-mail security list, such as the one found at our own Security Supersite at _http://security.ziffdavis.com, so that you learn about emerging threats quickly and can take proper precautions.
10. Be skeptical of things on the Internet. Don't assume that e-mail "From:" a particular person is actually from that person until you have further reason to believe it's that person. Don't assume that an attachment is what it says it is. Don't give out your password to anyone, even if that person claims to be from "support."
8 People Can Use The Same Msn Dial Up Account
its easy really. want to have an entire family on dial-up with just one bill?
step one. purchase 20 dollar a month subscription to MSN unlimited access dial up. This will include an MSN 9 cd which you will need. With the software installed, fill up your secondary account slots with new users. Make sure you pick @msn if it gives you the choice, hotmail email addresses will not work..
say the secondary account is johnsmith@msn.com type in the Dial up connection
USER : MSN/johnsmithPASS: ******* (whatever)
connect to your local msn phone number and the other people you gave secondary accounts to will be able to do the same, while you are connected. Its a sweet deal considering everyone is paying about 2 bucks a month for internet access, especially if you cannot get broadband. if you wanted to sell off the access to people you could actually make money doing this.. but i do not suggest it.
I used to be an msn tech and this was a little known secret even to most of the employees.
After you do this you do not need the software any more. I would suggest keeping it on to micromanage everyone else's accounts. and for the simple fact that if they don't pitch in, cut them off HEHEHE
i'm on broadband now so i dont care if i tell you my little secret. anyone else knew of this?
-[ How to rip Dynamic Flash Template ]-
How to Rip TM Dynamic Flash Templatesby: Baisan
What you need:
Sample dynamic flash template from TM websiteSothink SWF DecompilerMacromedia FlashYourself
1. browse or search your favorite dynamic flash template in TM website. If you got one... click the "view" link and new window will open with dynamic flash.. loading...
2. If the movie fully loaded, click View -> Source in your browser to bring the source code of the current page and in the source code, search for "IFRAME" and you will see the iframe page. In this example were going to try the 7045 dynamic template. get the URL(ex.http://images.templatemonster.com/screenshots/7000/7045.html) then paste it to your browser... easy eh? wait! dont be to excited... erase the .html and change it to swf then press enter then you'll see the flash movie again icon_smile.gif.
3. copy the URL and download that SWF file.. use your favorite download manager.. mine I used flashget icon_smile.gif NOTE: dont close the browser we may need that later on.
4. open your Sothink SWF decompiler... click "Quick Open" then browse where you download your SWF/movie file. Click Export FLA to export your SWF to FLA, in short, save it as FLA icon_smile.gif
5. Open your Macromedia FLash and open the saved FLA file. press Control+Enter or publish the file... then wallah! the output window will come up with "Error opening URL blah blah blah..." dont panic, that error will help you where to get the remaining files.
6. Copy the first error, example: "7045_main.html" then go back to your browser and replace the 7045.swf to 7045_main.html press enter and you'll see a lot of text... nonsense text icon_lol.gif that text are your contents...
NOTE: when you save the remaining files dont forget to save with underscore sign (_) in the front on the file without the TM item number (e.g. 7045) if it is html save it as "_main.html" and same with the image save it as "_works1.jpg" save them where you save the FLA and SWF files. Continue browsing the file inside Flash application so you can track the remaining files... do the same until you finish downloading all the remaining the files.
#DataVault, Irc Warez (Ty 4 Moving X)
Right 1st You Need mIRC (Download Below)
http://www.ircadmin.net/mirc/mirc614.exe
Once Downloaded And Installed.. Next Step Is To Get Yourself Connected To The Datavault Network..
Step 1 :- Open irc, Goto Tools,Options. Then Servers, Click AddUnder Description Type : DataVaultUnder IRC Server Type : irc.addictz.netUnder Port(S) Type : 6667-6669
Now Click Ok..
Step 2 : Connecting To Irc.Addictz.Net
Goto Tools/Options/ServersSelect Datavault From Drop Down MenuTick "New Server Window"Then Click Connect
A New Window Will Open Telling You That You Are Connecting To Irc.Addictz.net
Step 3 : Now You Have To Register YourSelf.
In The Window Type /msg nickserv register "your Password" "Your Valid Email"Next Type /msg NickServ IDENTIFY "The Password You Just Entered"
It Should Now Say Your Registered!
Now Type /J #Datavault
Step 4 : The Bots In DataVault Spam What They Host Every 1 Hour, Becareful Not To Spam These Or Else You Will Be Banned..
Every Hour You Will See What Looks Like Below :-
** To request a file type: "/msg slut02 BITCH send #x#1 392x [0.7G] Torque.DVDRiP.XviD-BRUTUS#2 1509x [0.7G] The.Butterfly.Effect.DVDRip.XviD-DMT
It's Simple To Request A Download Now..
There Are Different Bots With Different Names, Ie Slut02 Is Just One Bot, There Are More Called Dv44, Dv33 Slut03 Etc.. However The Trigger Principle Is The Sa,e
Now If For Example You Wanted To Download "The ButterFly Effect", In The Main Chat Window You Would Type or Copy /msg slut02 BITCH send #2
Let Me Explaine.. /msg Is The Trigger, Slut02 Is The Bot BITCH and Send Are Both Triggers #2 Is The File Number You Want. Each Bot Can Host Numerouse Files, Ie #1 Being Another Film, #3 Also Being Another Film.
Once You Have Done That And Press Return, Just Sit Back And Wait.. Either The Download Will Start Straight Away, Or You Will Be Qued (*Cough Dodgy Spelling*)
Right Now To The Benifits Of #Datavault..
1: The Latest Release Of Most Films And Games.2: 99.99% The Time You Get To Download At You Max BandWidth No Matter Your Connection (Either 56k (Omg Dont Download A 3 Gig File On That!!), Or A T1/OC3 Connection))
I Hope Someone Finds This HelpFull, If It's In The Wrong Place/ Or Inappropriate Then Plz Delete And Serve Me The Warning I Deserve....
Edit : It's A Good Idea To Have Auto Accept Dcc On, Incase Your Away When You Come InLine For Your Download, Generally Even If Your 20th In Que And It Says 3 Hours Wait, Your Prolly Looking At Around 30 Mins Waiting Slot..
Any Problems Please Let Me Know.. NN Peeps..
Latest orkut trick 2 make profile amazing
▓▓▓▓Copy Display pic ▓▓▓
Blazing Fast Shutdown
Make your own icons
It's shockingly easy to create your own icons in Windows XP. Let's do it: Click Start, click All Programs, click Accessories, and then click Paint. On the Image menu, click Attributes. Type 32 for both the Width and Height of the document, and make sure that Pixels is selected under Units. Click OK to create a new 32x32-pixel document: the size of an icon.Now add type, color, or do whatever you'd like to your image. I like to shrink photos (headshots work best) to 32x32 and simply paste them into my Paint document. When you're finished, open the File menu and click Save As. Use the dialog box to choose where you want to save your file, then give it a name followed by ".ico" (without the quotes), and click Save. (The extension ".ico" tells Windows that it's an icon file.) You just created an icon! Now you can change any shortcut or folder to your own icon—just browse to it on your hard drive.
HOW TO MAKE WINDOWS GENUINE

Here's how to make your copy of windows genuine...download jellybean keyfinder from hererapidshare.com/files/22706111/keyfinder.zipNow open keyfinder.exeClick on options and click "change windows key"Now enter this key and you're done. *****************************V2C47-MK7JD-3R89F-D2KXW-VPK3J *****************************P.S: this works on windows xp sp2 only...... ppl u can try this out...this might sound silly but it works perfectly...please send your comments....
1 out of 100 windows hidden tricks.
Hidden Star Wars Movie in Windows XP
WINDOWS XP CD KEY
How to Backup Windows XP

Learn how to backup your Windows XP computer quickly. This is a down and dirty full system backup. This will allow you to restore everything on your system if you had a system crash.Steps1. Click Start -> Run -> type in, with out the quotes, "ntbackup.exe" .2. Click on Backup Wizard and then "Next".3. Select the radio button "Backup everything on this computer" and click "Next".4. Choose a location where you will save your backup.5. Type in a name of your backup that you will recognize and click "Next".6. Click "Finish" and your backup will begin.7. It will complete and provide you a report of the backup.8. Click "Close" and your backup is complete.Tips* Make sure the location you are backing up to has enough storage space to backup your entire computer.* You will have to be certain you won't have to turn off your computer during the backup.* Full System backups can take extended amounts of time depending on how much data you have to backup so be prepared.
TO REMOVE VIRUS WHICH BANNES ORKUT
1) Press CTRL+ALT+DEL and go to the processes tab
2) Look for svchost.exe under the image name. There will be many but look for the ones which have your username under the username
3) Press DEL to kill these files. It will give you a warning, Press Yes
Repeat for more svchost.exe files with your username and repeat. Do not kill svchost.exe with system, local service or network service!
4) Now open My Computer In the address bar, type C:\heap41a and press enter. It is a hidden folder, and is not visible by default.
5)Delete all the files here
6)Now go to Start --> Run and type Regedit
Go to the menu Edit --> Find
Type "heap41a" here and press enter. You will get something like this "[winlogon] C:\heap41a\svchost.exe C:\heap(some number)\std.txt"
Select that and Press DEL. It will ask "Are you sure you wanna delete this value", click Yes
Now close the registry editor.
AND NOW YOU ARE DONE THE FUCK HAD BEEN SUCCESSFULLY REMOVED FROM UR COMPUTER.
View hidden passwords stored by Internet Explorer
When you choose to save a password in IE or Outlook, the data (”Protected Storage”) is stored encrypted in the registry under the following key:
“HKEY_CURRENT_USER\Software\Microsoft\Protected Storage System Provider”. But you cannot read this with the naked eye.
http://www.nirsoft.net/utils/pspv.html
This free utility decrypts the passwords and reveals the hidden information. This should be useful in case you cannot remember your password and want to retrieve it.
But it doesnt work on the latest version of ie tat`s ie 7...............
To fix the hidden files problem
Go to Start menu
Click Run
Type regedit in the text box and then click Enter.
When the Registry Editor opens, perform the following steps:
Go to the following registry key:
Go to HKEY_LOCAL_MACHINE and then open Software.Under this navigate to: Microsoft -> Windows -> Current Version -> Explorer Then go to Advanced -> Folder -> Hidden -> SHOWALL
Delete the value CheckedValue.
(Its type should be REG_SZ and data should be 2 or 0.)
Create a new DWORD value called CheckedValue (same as above, except that the type is REG_DWORD).
Modify the value data to 1 (0×00000001).This should enable you to select the ‘Show hidden files and folders’ option without much problem. So you get rid out of the problem..... }
make a autorun file for CD
2) now you writ: [autorun]
OPEN=INSTALL\Setup_filename.EXE
ICON=INSTALL\Setup_filename.EXE
Now save it but not as a .txt file but as a .inf file.
But remember! The "Setup_filename.EXE" MUST be replaced with the name of the setup file. And you also need to rember that it is not all of the setup files there are called '.exe but some are called '.msi
3) Now burn your CD with the autorun .inf file included.
4) Now set the CD in you CD drive and wait for the autorun to begin or if nothing happens just double-click on the CD drive in "This Computer"
Make the folder INVISIBLE without hiding
First u should make a folder without a name. To do it,
1)Right Click on the desktop.Make a new folder
2)Now rename the folder with a space(U have to hold ALT key and type 0160).
Then,
3)Now u have a folder with out a name.
4)Right click on the folder>properties>customize. Click on change icon.
5)Scroll a bit, u should find some empty spaces, Click on any one of them.click ok Thats it,now u can store ur personal data without any 3rd party tools
Play with your friends by removing shut down optio
Just hack it down !!!
Click on start>run(win key+r)
Then tpye “regedit” there, this opens up the registry editor, now goto
HKEY_LOCAL_MACHINE>SOFTWARE>Microsoft>Windows>CurrentVersion>Explorer
Then set “NoClose”=”DWORD:1
Trick - SHOW YOUR PC PENTIUM 5 OR MORE
SHOW YOUR PC PENTIUM 5 OR MORE
GO TO START>RUN>TYPE REGEDIT>HKEY_LOCAL_MACHINE>HARDWARE>DISCRIPTION>SYSTEM>CENTRAL
PROCESSOR>ON RIGHT HAND SIDE RIGHT CLICK ON PROCESSOR NAME AND STRING AND THE CLICK ON
MODIFY AND WRITE WHAT EVER YOU WANT OR NAME IT PENTIUM 5 OR MORE
HEYY FRNDS DO REPLY IF U LIKE THIS TRICK
CHANGE PASSWORDS OF OTHER USER ACCOUNT
1) Go to Run
2) Type"compmgmt.msc"
3) This should open the computer management console.
4) Then Go to local users & groups->users. Right click on the user and select "setpassword".
And change dats all
Disabling My Computer
To disable this:
1.Open RegEdit
2.Search for 20D04FE0-3AEA-1069-A2D8-08002B30309D
3.This should bring you to the HKEY_CLASSES_ROOT\CLSID section
4.Delete the entire section.
Now when you click on My Computer, nothing will happen.
You might want to export this section to a Registry file before deleting it just in case you want to enable it again. Or you can rename it to 20D0HideMyComputer4FE0-3AEA-1069-A2D8-08002B30309D. You can also hide all the Desktop Icons, see Change/Add restrictions.
Make a folder without a name...
1. Select the file, right click on it and click rename.
2. Press Alt and press 0160 without taking your hand off Alt.
3. Press enter and look at what happened!!!
A Million Recycle Bins
Just rename any folder with the extention .{645FF040-5081-101B-9F08-00AA002F954E}
LIKE_ Recycle.{645FF040-5081-101B-9F08-00AA002F954E}
The folder will be converted into recycle bin.
Restarting Windows without Restarting the Computer
Try Out ITs Nice
When you click on the SHUTDOWN button, make sure to simultaneous press SHIFT Button. If you hold the Shift key down while clicking on SHUTDOWN button, you computer would restart without restarting the Computer. This is equivalent to term “HOT REBOOT”.
lock ur folder without any software
Open Notepad and copy the below code and save as locker.bat. At first time start it will create folder with Locker automatically for u. Don't forget to change your password in the code its shown the place where to type your password.
after creation of Locker folder again click on the locker.bat.it will ask.press Y then Locker folder will be disappeared.again to get it click on locker.bat. and give ur password u will get the folder again.
cls
@ECHO OFF
title Folder Locker
if EXIST "Control Panel.{21EC2020-3AEA-1069-A2DD-08002B30309D}" goto UNLOCK
if NOT EXIST Locker goto MDLOCKER
:CONFIRM
echo Are you sure u want to Lock the folder(Y/N)
set/p "cho=>"
if %cho%==Y goto LOCK
if %cho%==y goto LOCK
if %cho%==n goto END
if %cho%==N goto END
echo Invalid choice.
goto CONFIRM
:LOCK
ren Locker "Control Panel.{21EC2020-3AEA-1069-A2DD-08002B30309D}"
attrib +h +s "Control Panel.{21EC2020-3AEA-1069-A2DD-08002B30309D}"
echo Folder locked
goto End
:UNLOCK
echo Enter password to Unlock folder
set/p "pass=>"
if NOT %pass%==type your password here goto FAIL
attrib -h -s "Control Panel.{21EC2020-3AEA-1069-A2DD-08002B30309D}"
ren "Control Panel.{21EC2020-3AEA-1069-A2DD-08002B30309D}" Locker
echo Folder Unlocked successfully
goto End
:FAIL
echo Invalid password
goto end
:MDLOCKER
md Locker
echo Locker created successfully
goto End
:End
Boot Screen Editor 9.9.2
Boot Editor is an editor to create boot screens for Windows XP.It can also change the default palette of boot screens and the position of the progress bar.Boot Editor is an editor to create boot screens for Windows
XP.It can also change the default palette of boot screens and the position of the progress bar.Boot Editor is an editor to create boot screens for Windows XP.
It can also change the default palette of boot screens and the position of the progress bar.Boot Editor is an editor to create boot screens for Windows XP.It can also change the default palette of boot screens and the position of the progress bar.
Code:
http://rapidshare.com/files/92099100/booteditornew.rar
XP REGISTRY TRICKS
Lock Out Unwanted Users
Want to keep people from accessing Windows, even as the default user? If you do not have a domain do not attempt this.
1. Open RegEdit
2. Go to HKEY_LOCAL_MACHINE\Network\Logon
3. Create a dword value "MustBeValidated"
4. Set the value to 1
Mobile Help Centre (For all Mobiles)
- NOKIA
Themes(.sis) [try all links for better results]
Games & Softwares (.sis/.jar/.jad)
- Sony Ericsson
Themes (.thm)
Games(.jar)
- Motorola
Themes & Skins
Games & Softwares
How To Build A Tin Can Waveguide WiFi Antenna
How To Build A Tin Can Waveguide WiFi Antennafor 802.11(b or g) Wireless Networks |
Got no dough for a commercial WiFi antenna? Looking for an inexpensive way to increase the range of your wireless network? A tin can waveguide antenna, or Cantenna, may be just the ticket. This design can be built for under $5 I am not an electrical engineer, nor do I have access to any fancy test equipment. I've built some antennas that worked for me and thought I would share what I learned. I have no idea if this is safe for your radio or wireless network equipment. The risk to you and your equipment is yours. Building your Cantenna is easy, just follow these steps.
|
Collect the parts:
You'll need:
- A N-Female chassis mount connector.
- Four small nuts and bolts
- A bit of thick wire
- A can
These vendors can supply the parts (the wire and can you provide yourself).
The Connector |
A Can |
Drill or punch holes in your can to mount the probe
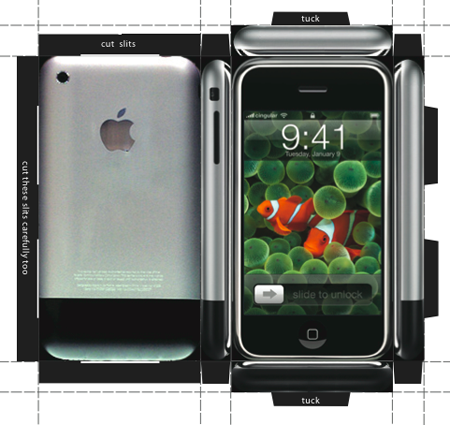
The N-connector assembly will mount in the side of your can. You need to put holes in the right place to mount the connector. The placement of the hole and connect is very important. It's location is derived from formulas that use the frequency that the antenna will operate at and the can diameter |
Assemble the probe and mount in canNow you'll need that bit of wire. You'll need a soldering iron or a friend with one as well. Cut the wire so that when it is stuck in the connector as shown, the total length of both the brass tube and wire sticking out past the connector is 1.21". Get as close to this length as you can. When you've got your wire correctly sized, solder it into the connector keeping it as straight and upright as you can. When it's cooled, bolt or screw the assembly into your can. Put the heads of the bolts inside the can and the nuts on the outside to minimize the obstructions in your antenna. Your Done! Connect your antenna to your wireless card or access pointTo use your cantenna, you'll need a special cable commonly called a "Pig Tail". The pig tail connects your wireless card or access point to you antenna. One end of the cable will have a "N" Male connector (just right for connecting your your cantenna), while the other end will have a connector appropriate to your card or access point. For a good picture of a pig tail, take a look at: You'll want to have a wireless NIC or access point with an external antenna connector. Otherwise, you may have to hack into the one you have to hook up the cable. I wouldn't recommend this unless you're good with a soldering iron and electronics. For this reason, I like the Agere Orinoco cards which have a nice antenna connector. Pig Tails can be hand made if you have the right tools, but it's probably easier to get a pre-made one. Try:
Hook up your cable, point the antenna at a friend's, and see how far you can stretch you network. Be sure to let me know (bloggikuttan@gmail.com) how it works. This antenna has linear polarization. That means that how you rotate the antenna will affect the strength of your signal. Usually, you will want to put the connection straight down, but experiment with rotating the can while watching the signal strength on your PC to get the best performance. |
Image scrap to all in orkut

- Get FireFox with Google toolbar before you continue.
- Upload the selected image into your orkut album.
- Open your uploaded image using Firefox (Download Firefox from the above link).
- Right click on the image and select "Copy Image url".
- Use this link to send a scrap through scrap all script.
- As the image is in orkut server, there will not be any word verification.
WINDOWS XP RUN COMMANDS

Accessibility Wizard - accwiz
Add Hardware Wizard - hdwwiz.cpl
Add/Remove Programs - appwiz.cpl
Administrative Tools - control admintools
Automatic Updates - wuaucpl.cpl
Bluetooth Transfer Wizard - fsquirt
Calculator - calc
Certificate Manager - certmgr.msc
Character Map - charmap
Check Disk Utility - chkdsk
Clipboard Viewer - clipbrd
Command Prompt - cmd
Component Services - dcomcnfg
Computer Management - compmgmt.msc
Control Panel - control
Date and Time Properties - timedate.cpl
DDE Shares - ddeshare
Device Manager - devmgmt.msc
Direct X Troubleshooter - dxdiag
Disk Cleanup Utility - cleanmgr
Disk Defragment - dfrg.msc
Disk Management - diskmgmt.msc
Disk Partition Manager - diskpart
Display Properties - control desktop
Display Properties - desk.cpl
Dr. Watson System Troubleshooting Utility - drwtsn32
Driver Verifier Utility - verifier
Event Viewer - eventvwr.msc
Files and Settings Transfer Tool - migwiz
File Signature Verification Tool - sigverif
Findfast - findfast.cpl
Firefox - firefox
Folders Properties - control folders
Fonts - control fonts
Fonts Folder - fonts
Free Cell Card Game - freecell
Game Controllers - joy.cpl
Group Policy Editor (for xp professional) - gpedit.msc
Hearts Card Game - mshearts
Help and Support - helpctr
HyperTerminal - hypertrm
Iexpress Wizard - iexpress
Indexing Service - ciadv.msc
Internet Connection Wizard - icwconn1
Internet Explorer - iexplore
Internet Properties - inetcpl.cpl
Keyboard Properties - control keyboard
Local Security Settings - secpol.msc
Local Users and Groups - lusrmgr.msc
Logs You Out Of Windows - logoff
Malicious Software Removal Tool - mrt
Microsoft Chat - winchat
Microsoft Movie Maker - moviemk
Microsoft Paint - mspaint
Microsoft Syncronization Tool - mobsync
Minesweeper Game - winmine
Mouse Properties - control mouse
Mouse Properties - main.cpl
Netmeeting - conf
Network Connections - control netconnections
Network Connections - ncpa.cpl
Network Setup Wizard - netsetup.cpl
Notepad notepad
Object Packager - packager
ODBC Data Source Administrator - odbccp32.cpl
On Screen Keyboard - osk
Outlook Express - msimn
Paint - pbrush
Password Properties - password.cpl
Performance Monitor - perfmon.msc
Performance Monitor - perfmon
Phone and Modem Options - telephon.cpl
Phone Dialer - dialer
Pinball Game - pinball
Power Configuration - powercfg.cpl
Printers and Faxes - control printers
Printers Folder - printers
Regional Settings - intl.cpl
Registry Editor - regedit
Registry Editor - regedit32
Remote Access Phonebook - rasphone
Remote Desktop - mstsc
Removable Storage - ntmsmgr.msc
Removable Storage Operator Requests - ntmsoprq.msc
Resultant Set of Policy (for xp professional) - rsop.msc
Scanners and Cameras - sticpl.cpl
Scheduled Tasks - control schedtasks
Security Center - wscui.cpl
Services - services.msc
Shared Folders - fsmgmt.msc
Shuts Down Windows - shutdown
Sounds and Audio - mmsys.cpl
Spider Solitare Card Game - spider
SQL Client Configuration - cliconfg
System Configuration Editor - sysedit
System Configuration Utility - msconfig
System Information - msinfo32
System Properties - sysdm.cpl
Task Manager - taskmgr
TCP Tester - tcptest
Telnet Client - telnet
User Account Management - nusrmgr.cpl
Utility Manager - utilman
Windows Address Book - wab
Windows Address Book Import Utility - wabmig
Windows Explorer - explorer
Windows Firewall - firewall.cpl
Windows Magnifier - magnify
Windows Management Infrastructure - wmimgmt.msc
Windows Media Player - wmplayer
Windows Messenger - msmsgs
Windows System Security Tool - syskey
Windows Update Launches - wupdmgr
Windows Version - winver
Windows XP Tour Wizard - tourstart
Wordpad - write


